Automated Rules for TikTok: How to Manage Your Ads Effectively
July 5, 2023
Learn how to automate your TikTok ads and why AutomatedRules is the best service for it.

In one of our previous articles, we explored the main reasons for including TikTok in your marketing strategy. Now, it’s time to delve deeper into the practical aspects of it and see how we can improve the process of running ads on TikTok.
As you may know, automated rules have already become an essential feature for many advertisers as it helps them automate different ad management tasks. Basically, it allows advertisers to work smarter, not harder.
If you’re looking to improve your current TikTok ads strategy, you might want to consider utilizing automated rules because with them, you can:
- Save time by delegating routine ad management tasks to algorithms;
- Improve ad performance in real-time by optimizing your ads instantly when it’s necessary;
- Control budget spending better by adjusting budgets and bids based on ad performance.
The principle of how automated rules work is quite simple: you specify a condition that determines whether your ad campaign is performing well or not => choose the action to make necessary adjustments to your campaign => and wait for the rule to be triggered when the condition is met.

TikTok’s native automated rules allow you to take the following actions:
- Get notified by email,
- Turn Off or On your campaigns, ad groups, and ads;
- Adjust Lifetime Budget for campaigns and ad groups,
- Adjust Daily Budget for campaigns and ad groups,
- Adjust Bid for ad groups.
For example, you can turn off ad campaigns with high CPAs to avoid overspending or increase the budget for campaigns with high conversion rates to optimize them for maximum ROI.
Now, let’s go through the steps required to create automated rules on TikTok and explore some basic rules that we can set for managing our ads more effectively.
How to create automated rules on TikTok
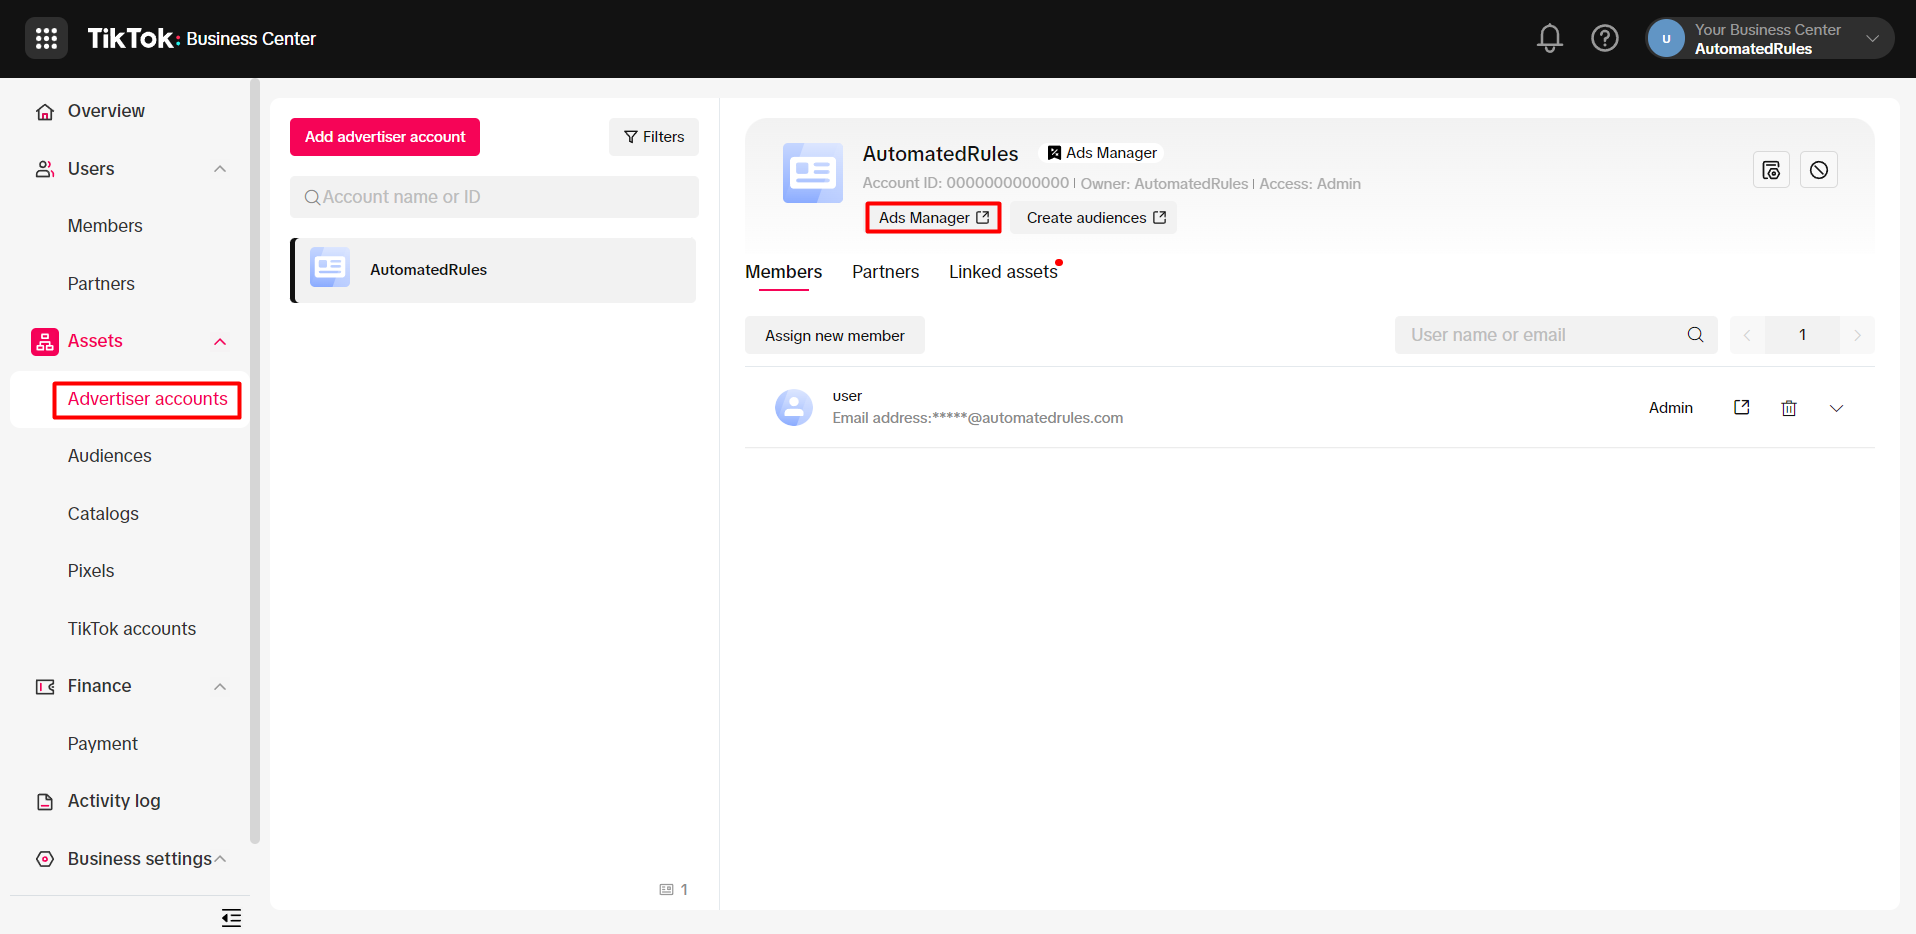
First, we’re going to log in to our TikTok Ads Manager. For this, we need to proceed to TikTok Business Center, go to the Advertiser accounts section, then open the Ads Manager.
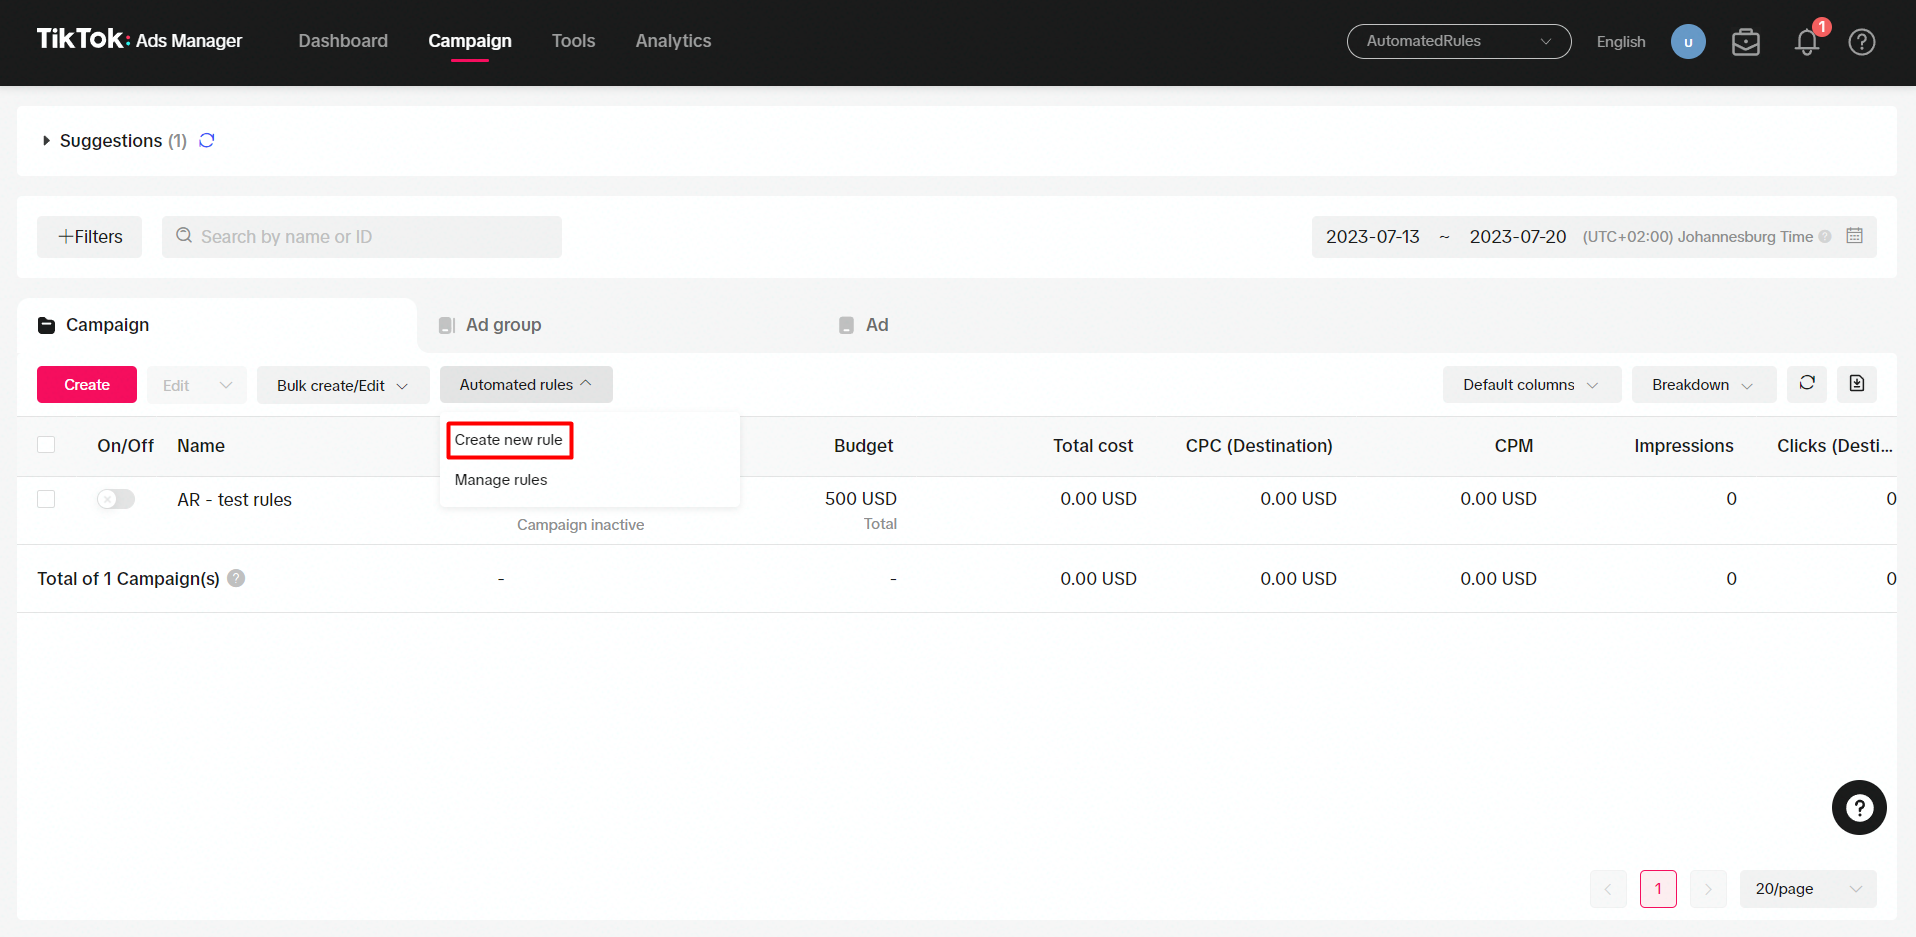
Next, we proceed to the Campaign tab, click Automated Rules, then choose Create a New Rule.
After the Automated rule setup window pops up, we’ll be presented with several types of rules that we can create:
- Custom rule – a rule without a template based on chosen metrics and conditions;
- Schedule delivery – a rule that allows to turn on ads at a specific time;
- Unlock potential – a rule for raising the bid on ads with the highest potential;
- Enhance performance – a rule for increasing the budget for well-performing ads;
- Control your budget – a rule for turning off ads with high costs.
If you’re a beginner, you might want to start with one of the rule templates as it’ll make the process a lot easier. In order to show all the possibilities, though, we’re going to start from scratch with a custom rule.
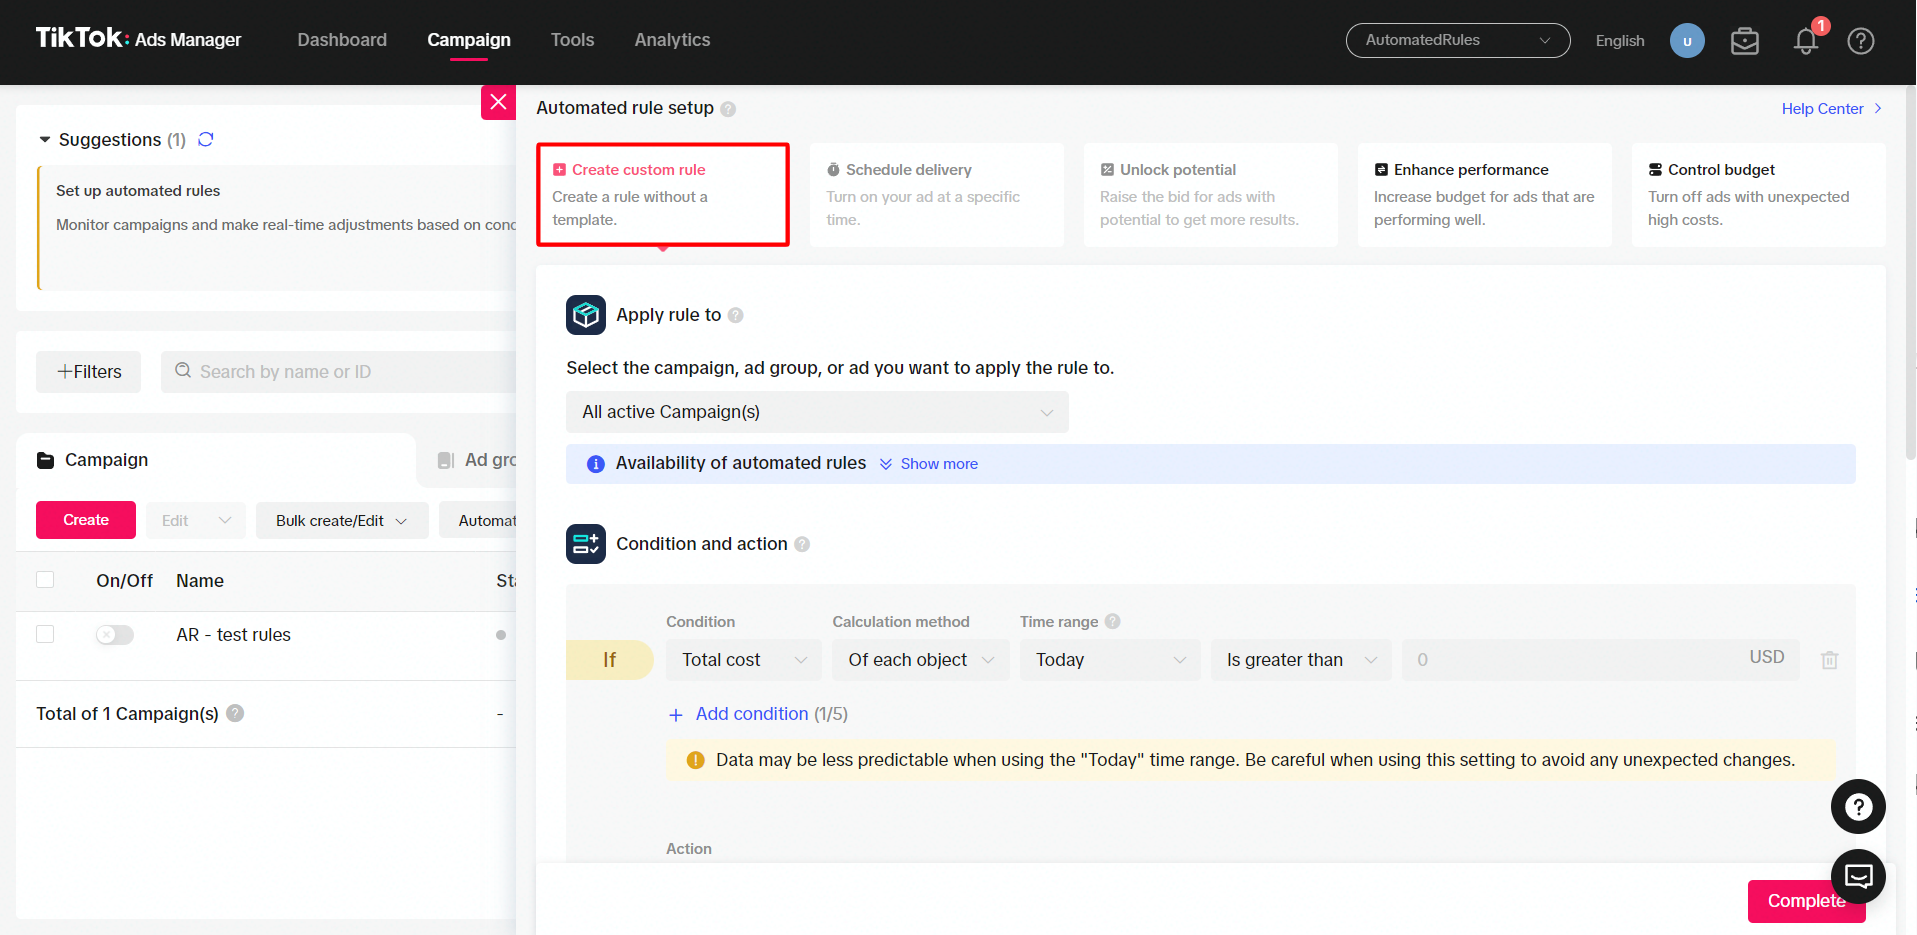
Next, we need to choose the items the rule will be applied to:
- A specific Campaign, Ad group, or Ad (for this, you need to select it within your campaign list first);
- All active items;
- All inactive items.
Note: automated rules can’t be used for Reach & Frequency ads or iOS 14 dedicated campaigns.
After we choose the scope of our rule (for example, All active Campaigns), we can move on to the Condition and action section and specify which actions will be performed on our ad campaigns and when.
The condition of a rule consists of a metric or a rule trigger, a time range within which a metric will be measured, and its value.
To see all available metrics and triggers for conditions, check out the full list from TikTok’s Business Help Center (note that it gets updated as new metrics and triggers become available). Keep in mind that the metrics and rule triggers that you can choose will differ depending on the selected rule scope.
Once we choose the right metric, we’re going to select the time range of data the condition will be based on.
The available time ranges on TikTok are:
- Today (note that if you choose this time range, the data may be less predictable),
- Yesterday,
- Last 3 days,
- Last 5 days,
- Last 7 days,
- Lifetime.
For some metrics (e.g. Total cost), we’ll also need to choose the calculation method. The available methods include “Of each object”, which means that the metric will be checked for each item separately, and “Of all objects”, which means that the metric will be checked for all items taken together.
To finish our condition, we’re going to specify the value of our metric. Metrics that are expressed in numbers or percentages can be greater than, less than, or fall between certain values.
For non-numerical rule triggers, the options will be different: for example, rule trigger Name can contain or don’t contain, begin or end with, or be a specific text, and so on.
Here’s how this will look in the TikTok Ads Manager rules dashboard:
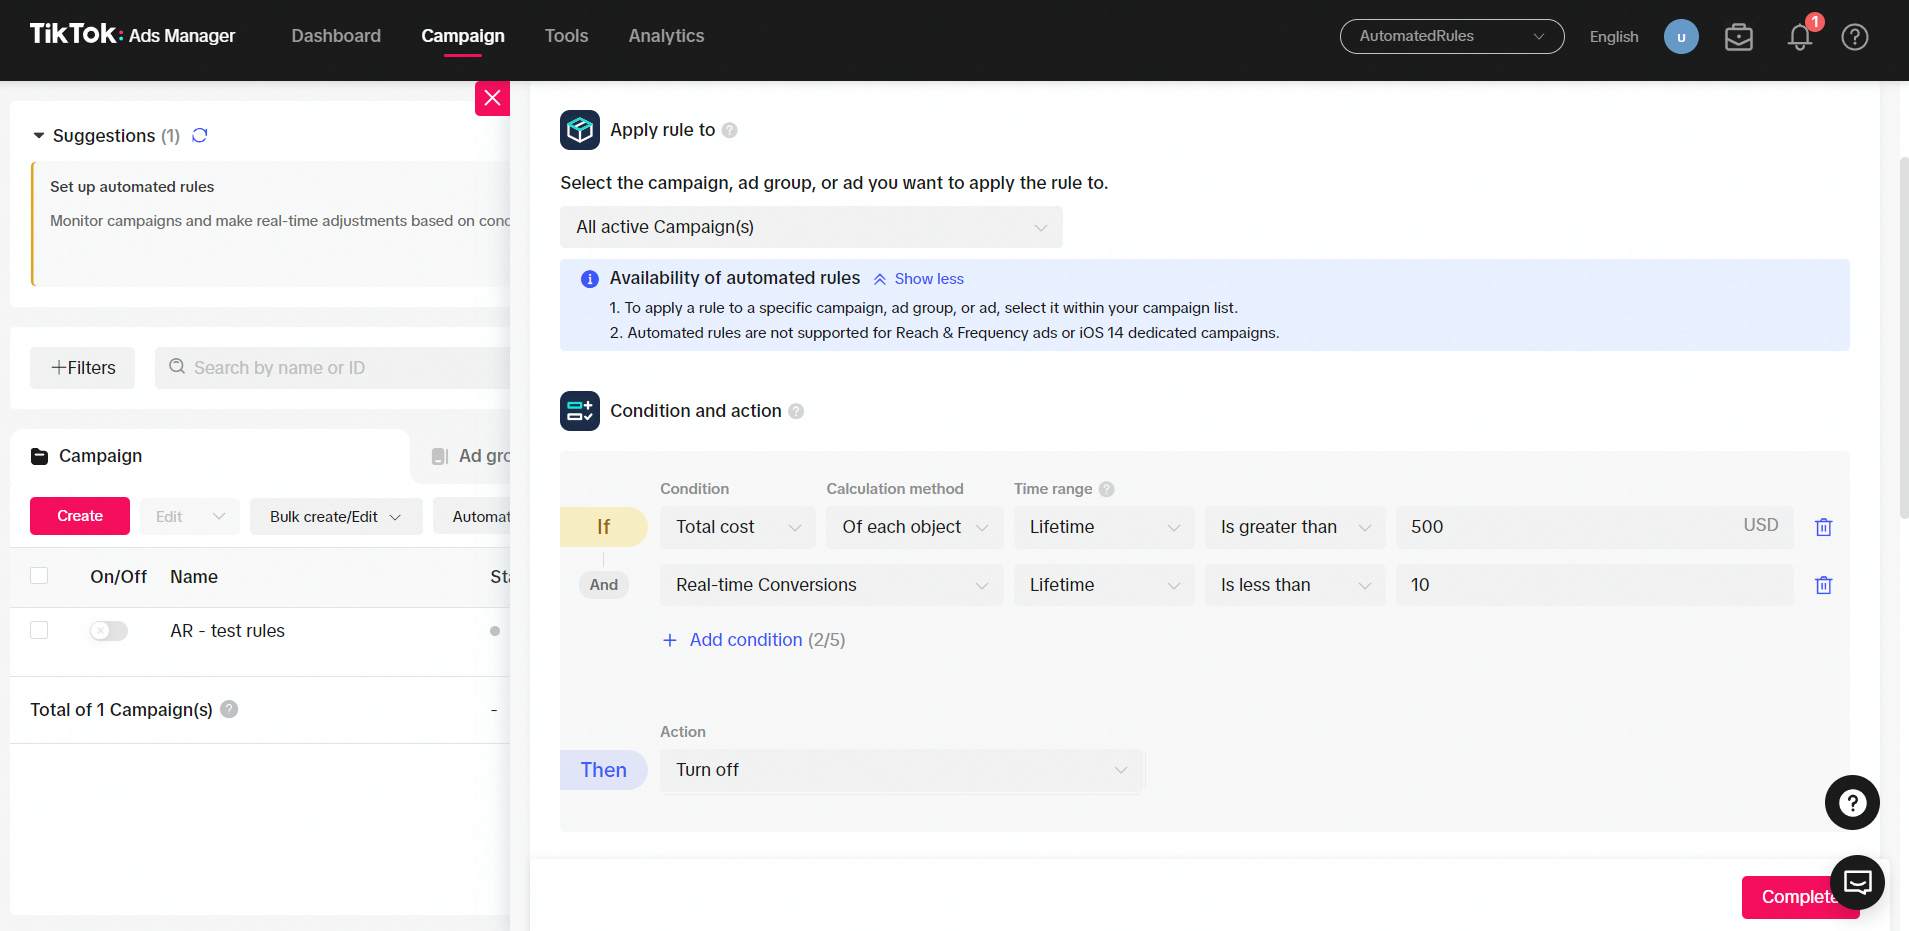
After we specify the value of our metric or our rule trigger, our condition is finished. One condition might be enough for a simple rule, however, you might want to add more conditions by clicking + Add condition.
Now that we’ve set up our conditions, it’s time to move on to the Rule settings section. There, we’re going to set the schedule for checking our rule conditions. We can choose among the following options:
- Run every 30 minutes,
- Run daily,
- Run at Specific Times (the rule will be running every 30 minutes during specific time periods).
For example, we can set our rule to run on the weekends the whole time to make sure that our ads are running optimally even when we’re taking a deserved break from work.
In the Notify me section, we can enable notifications to receive email alerts every time a rule gets triggered (i.e. when its conditions are being met) or only at specific times. We can also choose to get notifications when our rule is running even if the conditions aren’t being met.
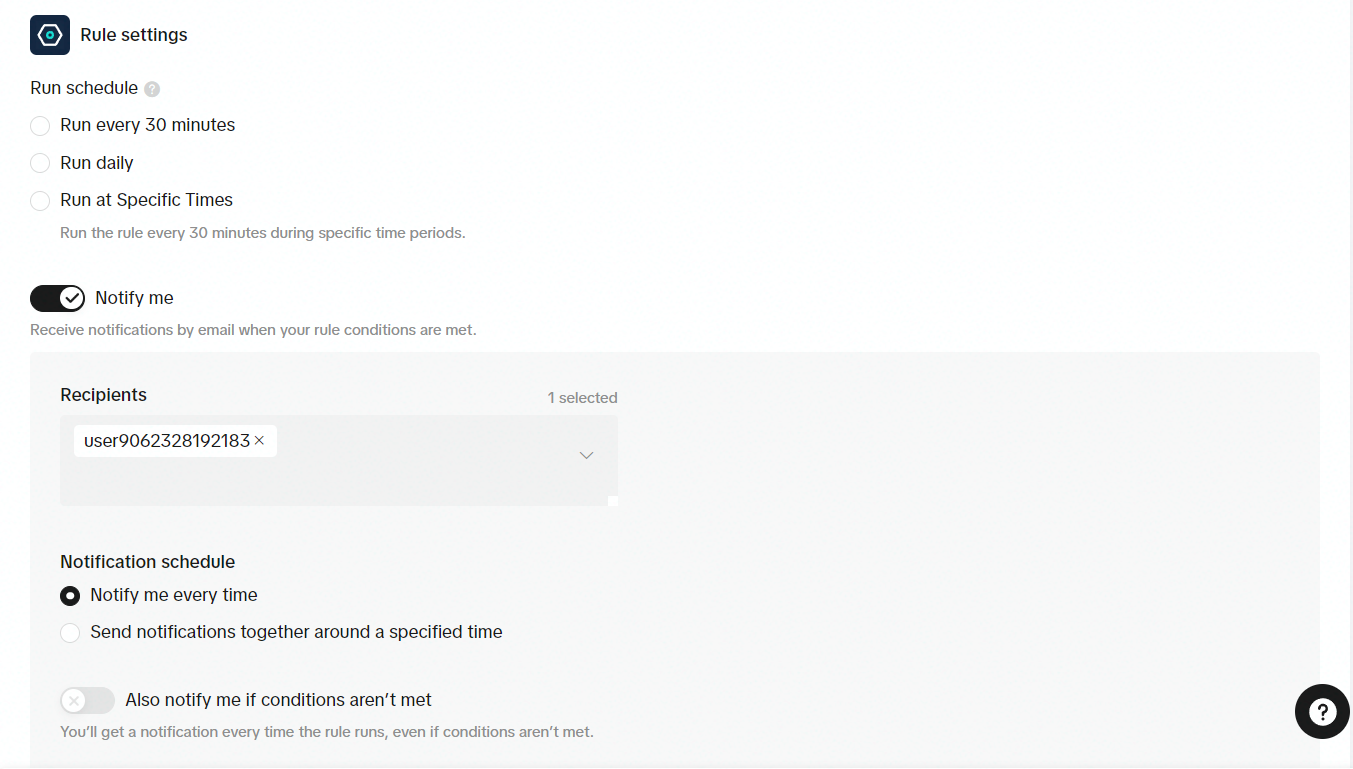
Lastly, we can name our rule. We recommend choosing a name that will reflect what this rule is supposed to do and for which items. For example, we can name our rule “Turn off unprofitable campaigns” so that we instantly know what it does.
Now, we can review our rule to check whether everything is set correctly and click Complete to finish the process.
Once you’ve created rules for your TikTok ads, you’ll be able to see them after clicking Manage rules in the Automated rules drop-down list. In this section, you can turn your rules on or off, edit or delete them, see the action history, and change logs. This will help you manage your rules, check when they were executed, and what actions were performed on selected items.
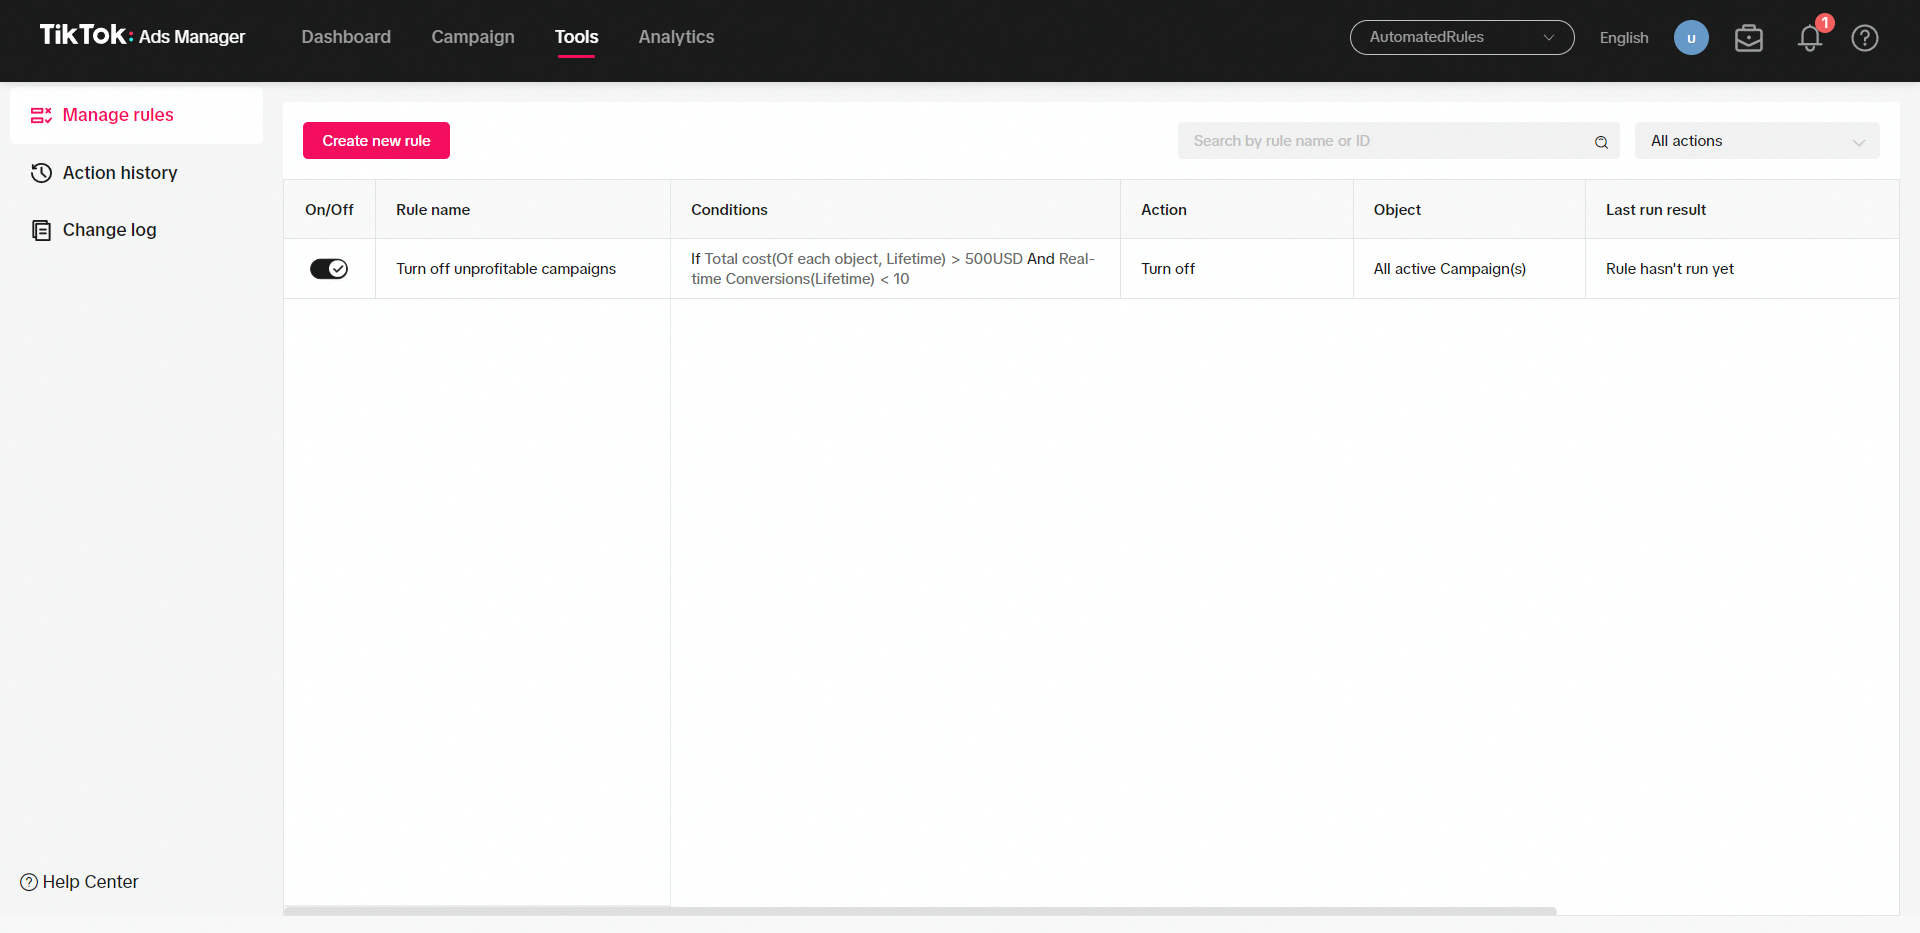
This will help you manage your rules, check when they were executed, and what actions were performed on selected items.
Basic rules for automating TikTok ads
Now that we know how to set automated rules on TikTok, let’s consider the 3 basic types of rules that can help us manage our ads more effectively.
First, we have pausing rules that allow us to turn off our ads when specific conditions are met.
Let’s say, for example, that we want to create a rule for pausing ad campaigns that spend too much of our budget but don’t deliver enough conversions. This rule might look like this:

According to this rule, each campaign that has spent more than $500 but delivered less than 10 conversions during the whole course of its running will be paused as a CPA of $50 is quite high for us. This way we can be sure that our budget won’t be spent in vain on unprofitable campaigns.
Second, there are scaling rules for increasing the budgets for campaigns that show good results.
For example, we can create a rule for scaling ad campaigns with low CPAs. Here’s what this rule might look like:
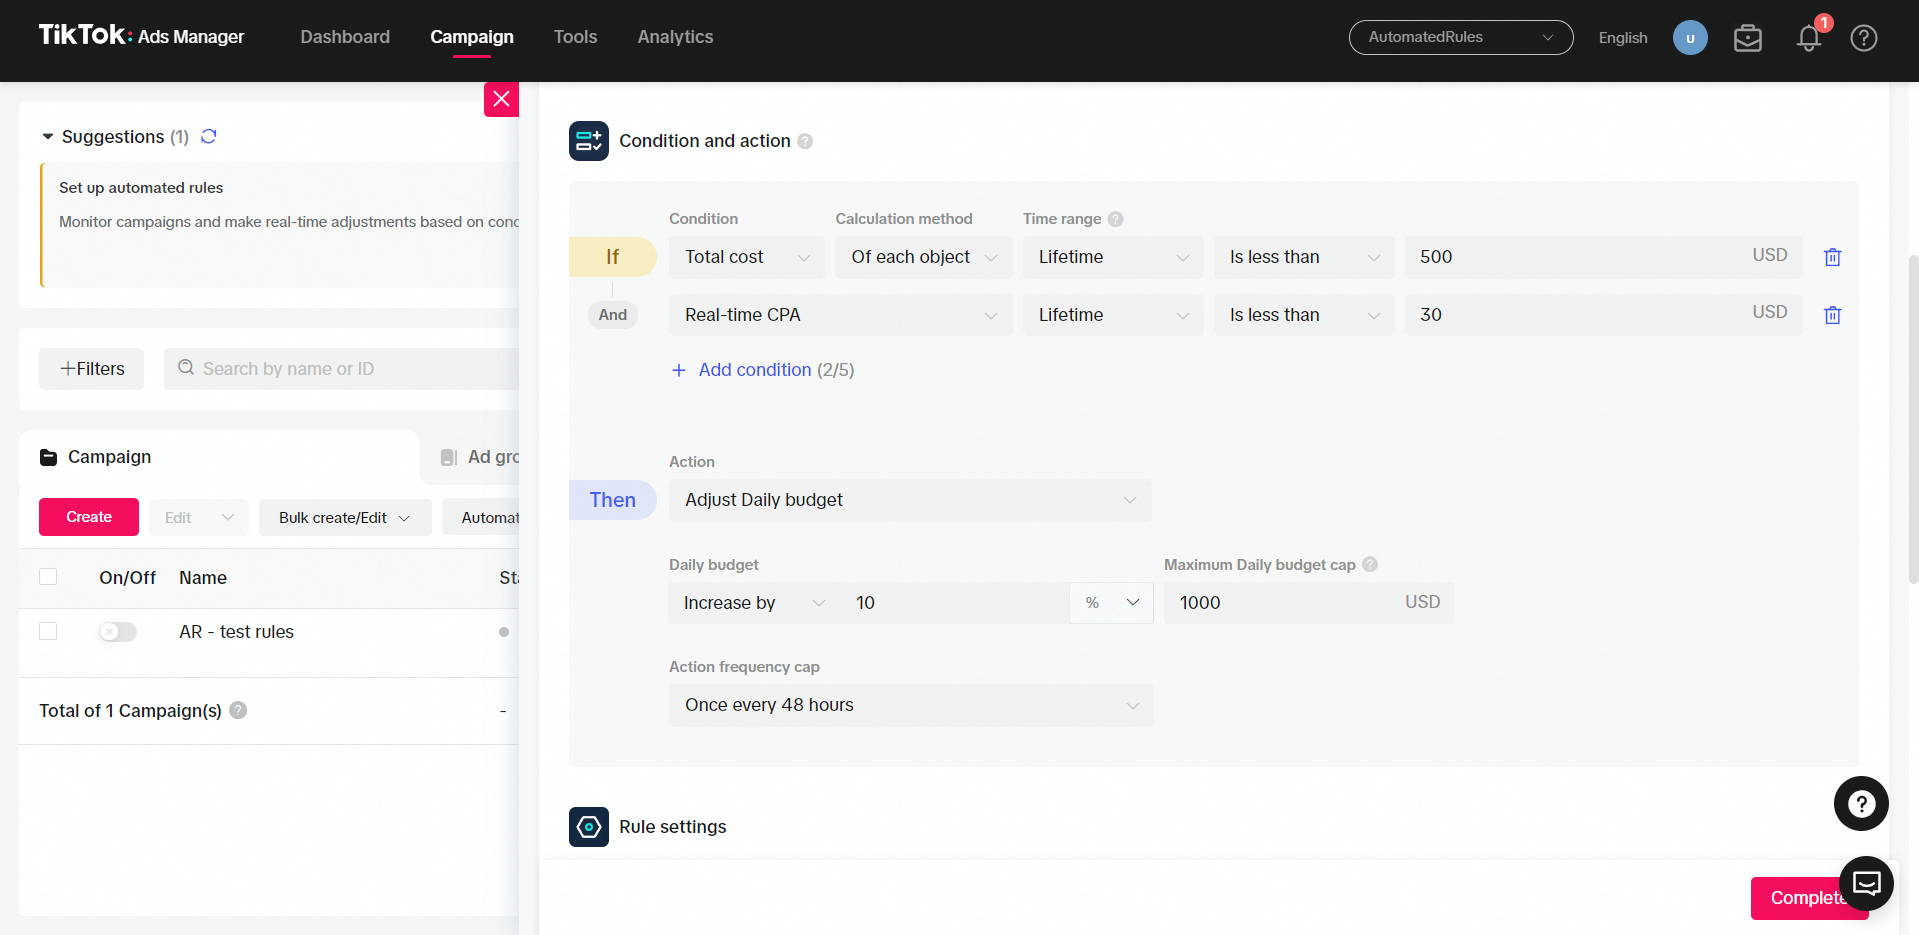
This means that for each campaign with a CPA of less than $30 that has not yet spent more than $500, we will increase its daily budget by 10% once every 48 hours until we reach our maximum budget cap (in this case, $1000). This will help us allocate our budget to top-performing campaigns and increase our overall ROI.
The third type of rule that we’re going to cover here is a notification rule. We might want to use this rule when we don’t want to optimize our ads automatically but want to just be aware of how they perform – notification rules.
For example, we create a rule similar to this one:
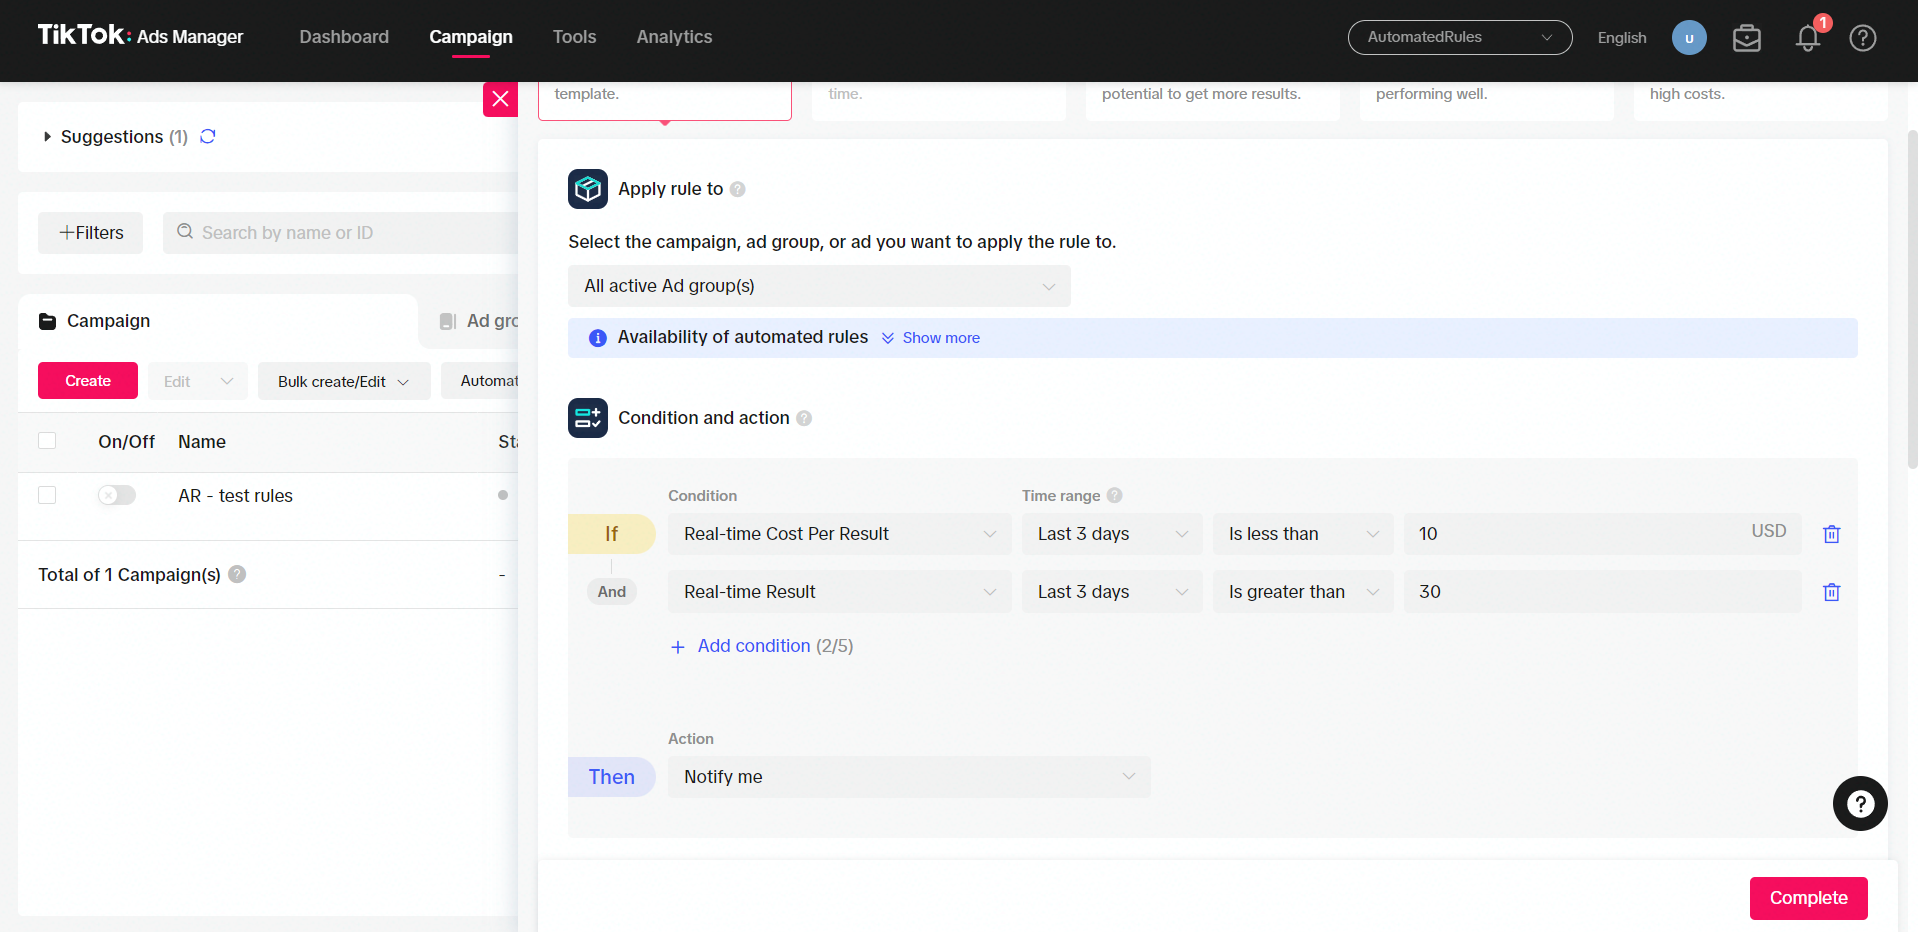
In this case, we’ll get notified when an active ad group had a low Cost Per Result while generating more than 30 results in the last 3 days. This can help us stay up-to-date with our ads’ performance and know when things are going well (even if we don’t want to scale the budget yet).
These are just some examples of the rules you can create in TikTok Ads Manager. Remember that practice is key: the more you experiment with your rules, the more you’ll learn about what works for your campaigns and what doesn’t.
As you can see, TikTok provides a great native tool for advertisers who seek to automate their ad management process. However, it can lack certain features and may not be as advanced as you need.
Luckily, there is a solution to this. Here, at AutomatedRules, we’ve developed a tool that offers a more advanced version of the automated rules feature not only for TikTok but for other platforms as well.
Let’s discuss some reasons why you might want to choose our platform to automate your TikTok ads.
TikTok automated rules vs. AutomatedRules
When compared with the native TikTok’s feature, AutomatedRules offers the following benefits:
1. There are more metrics that you can choose from
TikTok offers metrics for covering basic automation needs, but it may not be enough if you want to create more complex or advanced rules. AutomatedRules, on the other hand, provides an opportunity to experiment with different kinds of rules by using a wide variety of metrics.
For example, AutomatedRules allows you to choose metrics within the following categories that are not available on TikTok:
- App Installs (Installs and Cost per Install);
- Mobile App Events (Unique Add to Cart or Wishlist, Checkout, etc.);
- Cost per Mobile App event (Cost per Unique Add to Cart, Cost per Unique Add to Wishlist, Cost per Unique Registration, etc.);
- Video Play (Video Views at 25%, 50%, 75%, and 100%);
- Page Event (Page Browse, Button Click, User Registration, etc.);
- Cost Per Page Event (User Registration Cost, Add to Cart Cost, Initiate Checkout Cost, etc.);
- Time (Time greater or less than).
Note that these are just some of the metrics available on AutomatedRules, and you can explore all the options in the rules dashboard once you sign up for a free account.
2. You can create custom metrics
Besides using the standard options when choosing metrics, AutomatedRules also provides an opportunity to create your own custom metrics.
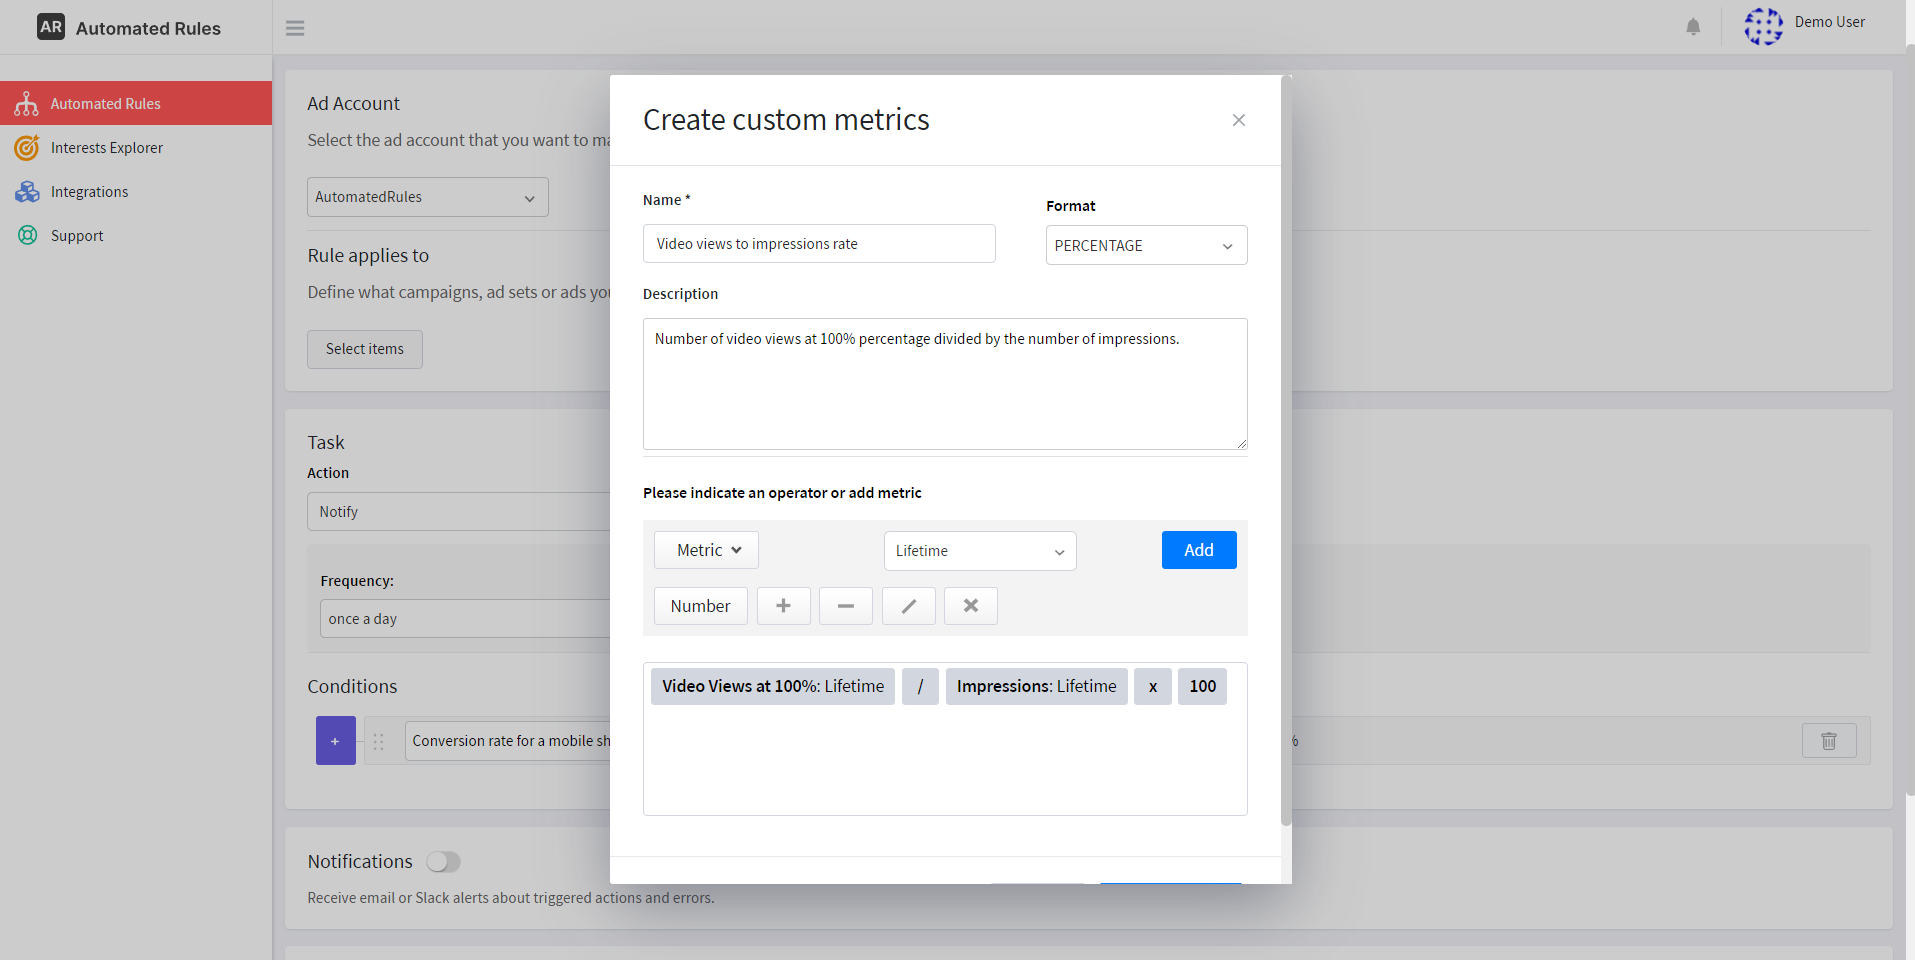
For example, you can create a metric that will measure the rate at which TikTok users tend to watch your video ad to the end.
Custom metrics give you more freedom to experiment and create complex rules tailored to specific ad campaigns.
3. You can use an advanced rule constructor
On TikTok, you can only create 5 conditions and use only the “AND” operator, which limits your options when it comes to making complex rules.
On another hand, AutomatedRules allows you to create an unlimited number of conditions, use both “AND” and “OR” operators, and group or nest multiple conditions. This way you can create rules as complex as you wish without any difficulty and make sure that conditions make sense for particular campaigns or ads.
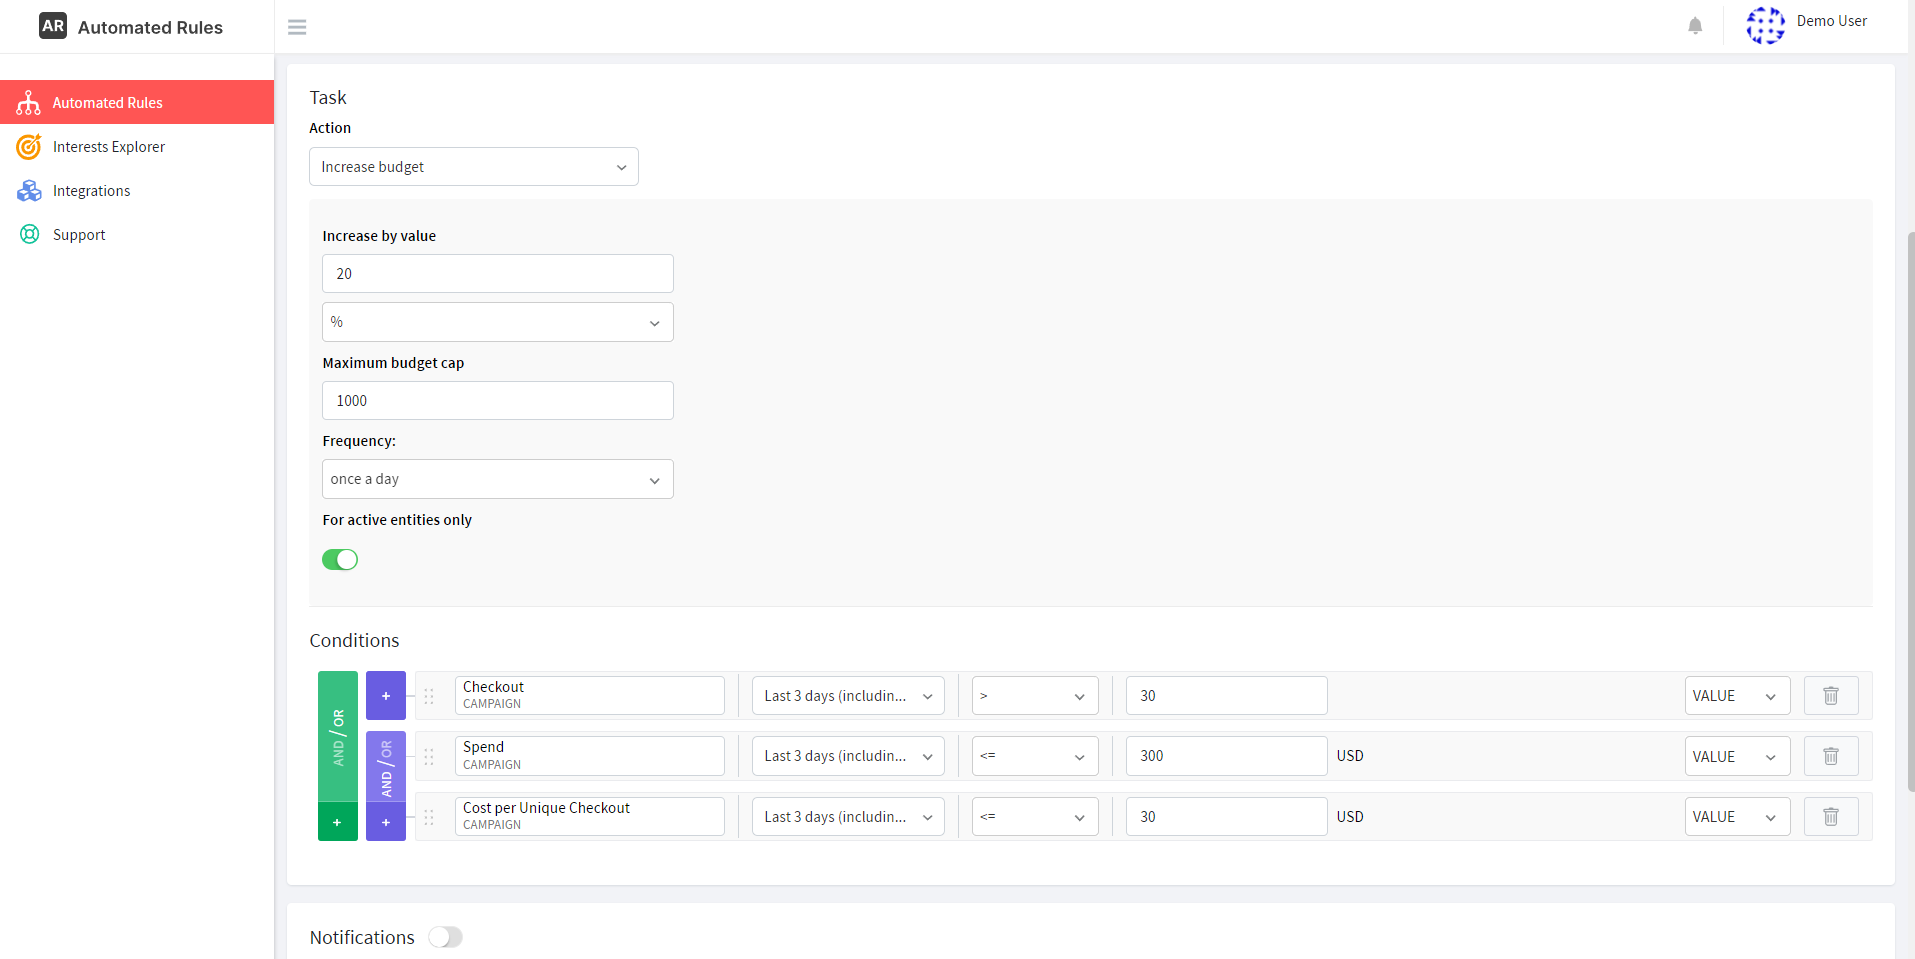
Moreover, AutomatedRules’ rule constructor also offers a lot more options than are available on TikTok. This includes:
- More actions that you can choose from, like Duplicate, Delete, Set budget, Scale budget by target field, etc.;
- More time ranges for checking your metrics, from a few days to several months;
- More operators for comparing metrics to values: Greater or Less than, Equal/Not equal to, Equal to or greater than, Equal to or less than, Is or Is not between, etc.;
- Ability to create ranking conditions and compare selected items to other items from the same level (e.g. ad sets to ad sets) based on a specific metric.
Finally, AutomatedRules allows you to receive not only email but also Slack notifications – this is crucial if you’re working as a team. Also, you can customize your rule-checking schedule as you wish, choosing what’s the most convenient for you.
For example, we can set a rule for scaling our campaigns in case at least one of the following conditions is met: the campaign either belongs to the top-performing items based on the number of checkouts or it has generated a lot of new registrations during the last 2 weeks.
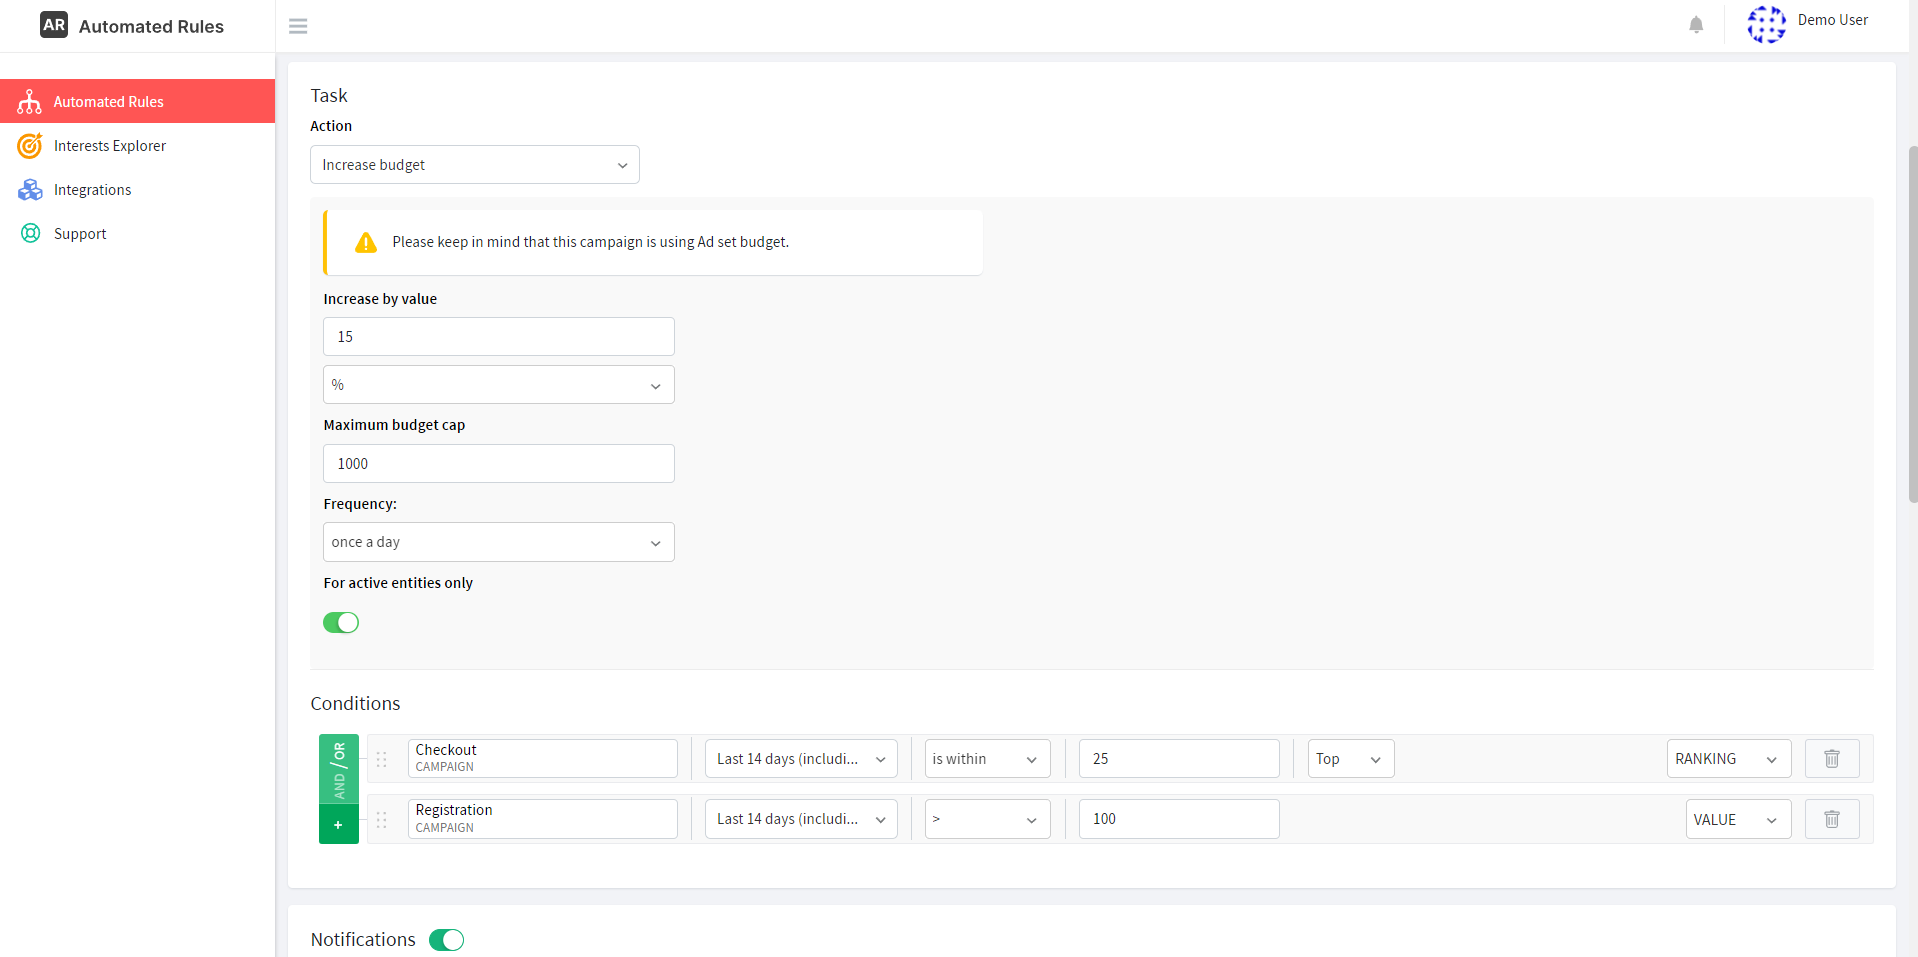
Next, we can choose to get notified by both email and our Slack channel and set a custom rule-checking frequency. The conditions of our rule will be checked during the night and early morning when we’re not actively monitoring ad performance – this way we can be sure that the necessary action will be taken if we’re offline.
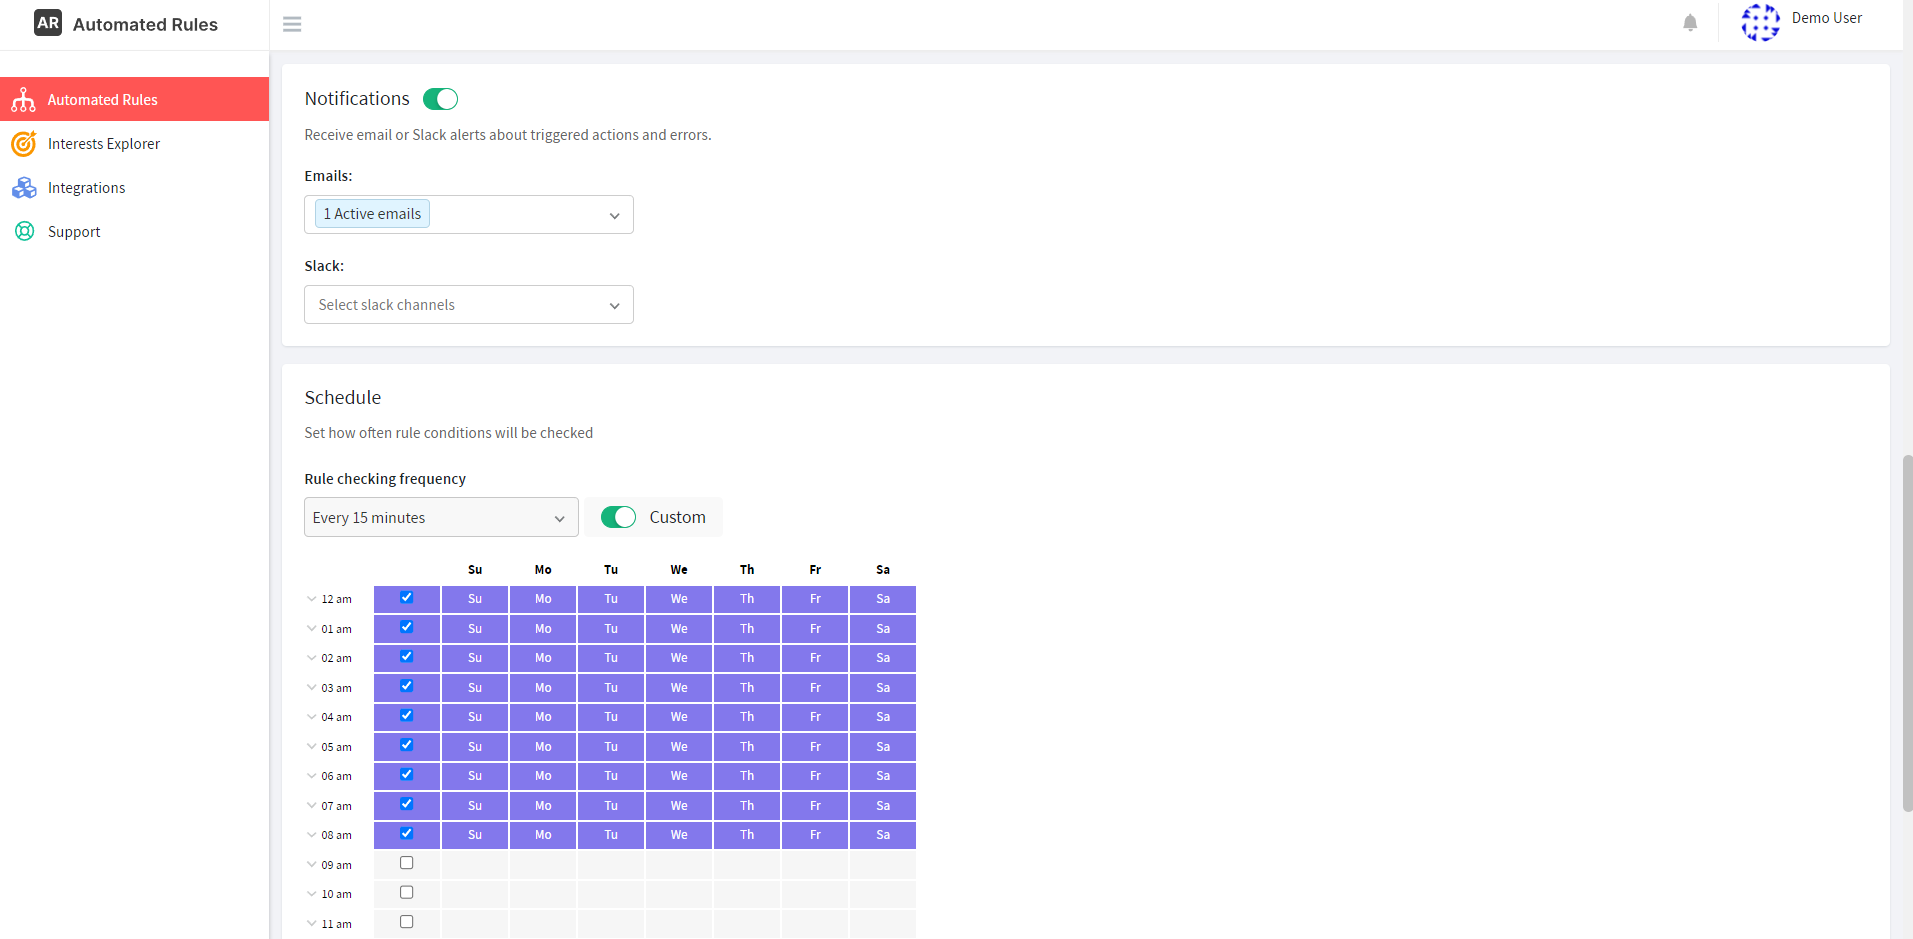
As you can see, with AutomatedRules you can create conditions with AND/OR operators, stack or nest them, select among different time ranges and values for metrics, and a lot more to build complex rules tailored to your needs. You can explore all the possibilities by signing up for a free AutomatedRules account today!
Best practices for using automated rules for TikTok ads
Finally, let’s consider some tips that can help us automate our TikTok ads better. It can be overwhelming to manage multiple ads on TikTok and other platforms, and while automated rules offer a great solution to this problem, successful automation is not an easy goal to achieve.
Here are some recommendations for utilizing automated rules effectively:
1. Define clear campaign objectives
This step is essential not only when you’re setting up your campaigns but also when you’re creating rules to automate them. Your campaign objective will determine what success will look like, help you choose key performance metrics to track and identify the appropriate conditions for your rules.
2. Combine manual and automated management
Even if you use automated rules, it’s necessary to maintain human oversight. Consistently monitoring the performance of your campaigns and tackling more difficult tasks manually is essential for controlling the situation and minimizing the risk of mistakes.
3. Start with simple rules
If you’re just starting your automation journey, you might want to keep it simple. Start by setting basic rules that are easy to understand and implement, and as you gain more experience and familiarity with the platform, you can gradually introduce more complex rules.
4. Test and refine
While automated rules help you manage and optimize your ads automatically, it’s also important to assess whether the rules you’ve set work as intended.
As you automate your ads over time, you’ll be able to determine whether they help you improve campaign performance and achieve your goals or if they need some adjustments – checking rule logs will help you with this. If you see, for example, that a particular rule did not lead to performance improvement or wasn’t triggered, you might want to revise its settings (i.e. metrics, conditions, and actions) to find a more effective configuration for your rule.
5. Don’t forget to set up notifications
Even if you’re sure that you’ve set up your rules correctly and your ads will be running smoothly without your input, you still might want to stay in the loop with what’s happening. Setting up notifications will help you stay aware of any significant changes that happen to your ads, and this is crucial for taking timely action.
If you want to learn more about the best practices for using automated rules, check out one of our previous articles for additional tips.
Hopefully, by now you’re equipped with all the necessary knowledge to start automating your TikTok ads. If you’re interested in leveling up your automation game, sign up for an AutomatedRules account to get access to many advanced features not available on TikTok.
Need some help or have questions? Book a demo with our Customer Success team or contact us to start your marketing automation journey.
